DIY Mix for Bread Machine
This is a homemade mix for bread dough to be made up in a bread machine (or a stand mixer.)
It yields a satisfying, whole-grain loaf of everyday soft-crumb sandwich bread.
The directions give you a ton of options to personalize the mix (and how you use it) for your own tastes. Provided you choose options within the guidelines, you should still have successful loaves of bread every time you use the mix. (You can use all white flour if you wish!)
Having this mix on hand lets you have a loaf of multi-grain bread started in under 2 minutes in your machine. The recipe, with its roots in a depression-era bread recipe, is naturally low in salt, sugar and fat, as all those ingredients were expensive during the Great Depression!
Healthy Canning has developed and tested this mix over three years.
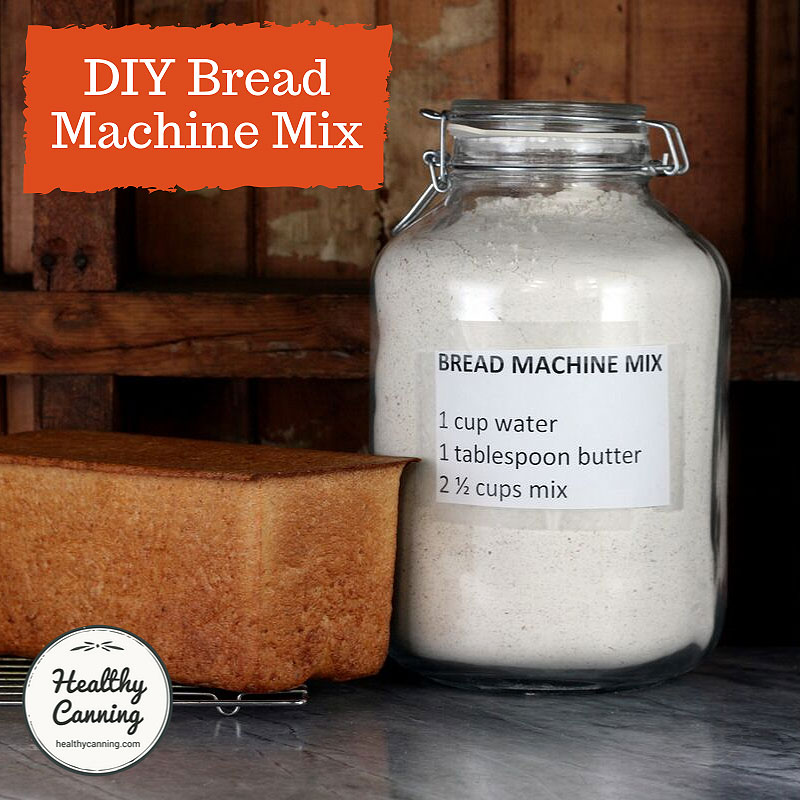
Yield: One batch of mix yields 2 ½ quarts of mix, which yields 4 x 550 g / 2 lb loaves of bread. You will need a 2 ½ quart / litre size container or jar to store the mix in. The jar shown in the photos is a 5 quart / litre jar, holding a double batch of the mix.
Made-up yield: Using 2 ½ cups (400 g) of the mix yields a 550 g / 2 lb loaf of bread with 15 slices in it.
The mix recipe

DIY Bread Machine Mix
Equipment
- Very large bowl or pot
Ingredients
- 700 g all-purpose flour (4 ½ cups)
- 300 g whole wheat flour (2 cups)
- 300 g other flours (2 cups, of your choice)
- 100 g powdered milk (1 cup, instant. Regular skim, or buttermilk)
- 125 g gluten flour (¾ cup)
- 4 tbsp dried yeast (regular or bread-machine)
- 4 tbsp brown sugar
- 3 tsp salt
- ¼ tsp vitamin C powder (aka ascorbic acid. Optional. A baker's trick for better rise and volume.)
Instructions
- Mix all thoroughly.
- Store in a tightly-sealed container. For best storage life, store in a cool, dark place away from heat and light.
Nutrition
To use the mix for a loaf of bread
Place ingredients in bread machine pan, or stand mixer bowl, in order given.
To make a 1 kg (2 lb) loaf
1 cup (250 ml) water in bread pan, plus 1 tablespoon of fat of your choice (margarine, butter, oil, shortening), 2 ½ cups (400 g) mix.
To make a 2 kg (4 lb) loaf
2 cups (500 ml) water in bread pan, plus 2 tablespoons of fat of your choice (margarine, butter, oil, shortening), 5 cups (800 g) mix.
To bake in bread machine
Choose usual bread option for your machine, the one that includes both making the dough and baking it all in one go.
To bake in oven
- Have greased or sprayed 2 lb (or 4 lb if appropriate) bread pan ready;
- Mix in bread machine on dough cycle;
- Let rise till first machine punch down;
- Remove dough from bread machine;
- Turn bread machine off;
- Place dough in prepared bread pan;
- Cover with light tea towel, let rise;
- Remove towel;
- Bake in hot oven at 190 C / 375 F for about 35 to 40 minutes;
- Loaf is fully cooked when it sounds hollow when you tap it;
- Using oven mitts, remove from oven and turn off oven;
- Again using oven mitts, immediately turn bread out of the pan and onto a wire rack for cooling. When cool, store the bread. (Leaving bread in the hot pan will make the loaf soggy and it won’t really recover from that.)
Note about the amount per batch
The volume measurement of 2 ½ cups may vary based on the measuring cup — we have several dry measuring cups right here even that don’t agree with each other (there’s literally no law requiring them to be accurate.) The weight of the 2 ½ cup measurement, which we give as 400 g (14 oz), may vary based on the weight of the optional ingredients you chose to use (if you use a lot of bran or weight germ it may be lighter, for instance). Generally, the weight may come in between 350 to 400 g / 12 to 14 oz; we’ve gone with a round number. If it looks dry in the machine, add a tbsp more water. If it looks too wet, add a tbsp more mix and make a note for next time. If over time you decide that your particularly mixes really require, say, 3 cups of mix, then make a note and do that.
Dough dryness
Watch the dough in the first 5 minutes of mixing. Water requirements will vary by time of year, humidity in the flour mix and of course what you put in your mix. Usually an adjustment of a teaspoon or so of water will fix dough that is too dry; add extra water very little by very little. Too dry (and therefore too tight) a dough results in a poor rise. If you add too much water by mistake, add a few tablespoons more mix until the dough is less sloppy.
Shelf life of the bread
When the bread has cooled, store it in a bread bin/box at room temperature and use up within 3 to 4 days. Or, store in a paper bag which is then put into a plastic carrier bag at room temperature (the paper bag absorbs excess moisture, while the plastic bag stops it from going dry.) Or, store in a container or in a plastic bag in the fridge (dries bread out faster.) Or, freeze for toast bread.
As there are no preservatives in this, after 4 days or so particularly in hot weather mould may start to develop. If this happens, discard – do not attempt to cut mould bits off and consume the rest. If it happened in a bread bin, scald the bread bin with boiling water and soap. But to avoid this happening to a loaf you aren’t getting around to finishing, cut the remaining loaf into small cubes and set out in a single layer on a plate for several days to dry into croutons for use in salads, homemade stuffing, etc, or for grinding once dry into bread crumbs. Or freeze the remainder for use as toast bread.
Notes on creating the bread mix
Instead of the brown sugar, you could use white sugar. (You may particularly want to do this if you are using an all white flour mix. )
The sugar is here to feed the yeast. All bets are off if you leave it out.
Instead of three teaspoons of salt, you could use 1 teaspoon salt and 2 teaspoons salt sub. If so, do use the 1 teaspoon of salt: it’s there to control the yeast growth. In classic bread recipes such as this, you want some sugar to feed the yeast, but some salt to hold it back to make sure it doesn’t go out of control. The additional salt beyond the 1 teaspoon is for flavour, so using salt sub for the additional salt is fine.
We recommend first making just one batch of the mix at a time, until you develop a feel for what is working for you reliably all the time re your choice of white flour, and other flours. Once you have hit that point, you will probably want to make the mix in doubled or quadrupled batches. Just do the math first on paper so you don’t get mixed up — and make sure you have a huge enough bowl or pot to mix it in, and a container large enough to store it all in (each batch requires 2 ½ quart / litre volume of storage space.)
No, we do not have a vegan version of this.
Flour notes
The 50% white flour is critical. It is what guarantees a rise and a successful loaf. If you want to try reducing this proportion and increasing the proportion of whole wheat and other flours, by all means try it, but you’re on your own: we have not tested it for rise or ability to satisfy a general audience.
For all-purpose flour: in the US and Canada, use all-purpose. We tested the mix with strong all-purpose flours 11% protein and higher (such as King Author at 11.7%, and many Canadian all-purpose brands including no-names – Canadian flour tends to be the strongest in the world.) Elsewhere in the world, the safest bet results-wise may probably be to use bread flour. If you live in a part of the US such as the south where the all-purpose brands such as White Lily tend to be weaker (7-8.5% protein according to Cooks Illustrated), you can try your usual all-purpose flour but bread flour may end up being a better bet. Or, you may find that the gluten flour component we have included as “insurance” covers you.
Instead of the whole wheat flour, you can just use more of the white flour you chose as the first part of this mix.
For the “other flours” part, you can just use more white or whole wheat, or a mixture of whole grain things, which can include wheat germ, wheat bran, oat bran, oat flour, rolled oats, cornmeal (lower rising loaf though), rye grits, rye flour, barley flour or barley flakes, flax seed flour, spelt flour, etc etc.) The “other flours” part is where you can be creative to suit your audience. Note that for dense, heavy things such as cornmeal or buckwheat flour, if you want a decent rise on your loaf, it is probably best to have them be just a small portion of your other category, rather than constitute the whole of it.
If you use all white flour, or half white / half whole wheat skipping the “other flour” category, then you can omit the gluten flour. The gluten four is there essentially to compensate for the unpredictability of choices that may be made in the “other flours” category, and still guarantee a quality rise resulting in a satisfactory baked product that won’t have people telling us this is more like a pancake mix than a bread mix.
Remember that the extra oils in whole grains shorten the storage life of them (coincidentally, that’s one of the reasons people came to prefer white flour for a longer storage life.) So create batches of this mix in quantities of what you will use in a reasonable time frame, and store in a cool, dark place to slow down the aging of the whole grains.
The mix is half whole-grain for result reasons (see above about 50% white flour), as well as for “audience satisfaction” reasons as many people do not like pure whole grain breads which can tend to have less rise, be heavier, and seem “scratchier” in the mouth and throat, and therefore they decline to consume them. Our reasoning is that “perfection can be the enemy of the good” and if you can at least get them eating half whole grains, which this mix has a good chance of doing, then you have already achieved a great deal.
No, we do not have a gluten-free version of this.
Notes on using your bread mix
Want to add some honey? Honey will give the loaf a much darker crust. But it can also extend storage life of a made-up loaf in bread bin by a day or so. If you want to use honey, at time of use, add 2 to 3 tablespoons of liquid honey to the bread machine pan along with the fat and water, reducing the water by an amount equivalent to the honey you put in. Some readers may ask: “if I’m adding honey at the time of use, can I then omit the sugar from the mix?” That certainly sounds logical and possible, but we have not tested it. You could try and let us know.
For a moister loaf, instead of 1 tbsp of fat you could use 2 tbsp of fat.
It is fine to use a light margarine.
“Let rise till first machine punch down. (Set a timer on your phone or stove).” This only applies if you are going to take the bread dough out of the machine and bake it in a real bread pan. Standard dough cycles on many bread machines do two rises and two punch downs. If you are going instead to be baking the bread in a real bread pan in a real oven, then you want the second rise to occur in the real bread pan, not in the bread machine. Otherwise, by taking it out of the bread machine after the second rise, you will in effect be doing three punch downs to the dough, and your third rise in the real bread pan will be poor. You will probably have to watch your machine closely the first time you do this to learn exactly how long it takes your model of bread maker to reach the first punch down. Record that time so you know for the future. If you make the dough in a stand mixer like a kitchen-aid, you’ll just have to learn by watching and making a judgement call how long it takes for the dough to do its first rise — then record that time and in the future set a timer for that.
Yes, of course, you could possibly mix and knead the dough by hand, but hand mixing and kneading usually require the addition of more flour as you go, and we have not tested this.
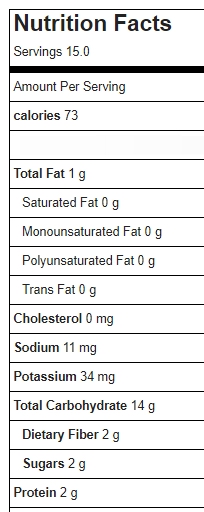
Nutrition
Standard make-up directions yield a 550 g / 2 lb loaf with 15 slices in it.
Nutritional information based on using a light margarine as the fat.
2 Freestyle SmartPoints® per slice
* Nutrition info provided by MyFitnessPal
* SmartPoints™ calculated by healthycanning.com. Not endorsed by Weight Watchers® International, Inc, which is the owner of the SmartPoints® registered trademarks.


Leave a Reply